Two-Factor Authentication | Deeper Look
Nowadays with a world full of hackers and scammers trying to steal ones data, our online security needs to be constantly improved. One way to do this, is through two-factor authentication. Today we will have a look at why a second factor for a login is important and how it works in the backend.
3 Methods of Authenticating a User
There are three different types of authentication.
- Method A – The user knows something. E.g. username or password.
- Method B – The user has something. E.g. a device to generate a token.
- Method C – The user is something. E.g. recognition of a fingerprint or face of the user.
A standard application, for example a website, will often implement method A by asking the user for his username and password. But more and more websites have begun to allow the user to add a second factor.
In high-security environments, a third factor is often introduced. For example an iris or fingerprint scan is needed in addition to the username, password, and token. In some special cases you may find these authentication methods used multiple times in succession for enhanced security.
Why Multiple Factors Matter
A username and a password are not secure enough anymore. If a hacker obtains a password of yours, for example, through fishing or a Brute-Force attack your account can be in serious danger. To close this security gap, a second factor has been introduced. A token that is generated on the client’s device and does not need an internet connection. This second factor is often implemented as TOTP, which is explained below.
Even though it is unlikely that your accounts will be target of such an attack and therefore be compromised, it is highly recommended to enable two-factor authentication wherever you can, as it grants you another layer of security.
How Two Factor Authentication with TOTP Works
What is TOTP
TOTP, short for Time-based One-Time Password, is an algorithm which generates single use passwords. These are also referred to as tokens. These tokens are only valid for a certain period of time, which is often 60 seconds. The TOTP algorithm extends the HOTP algorithm, also known as the HMAC-based One-Time Password algorithm. The purpose of the HOTP algorithm is, to create a one time password from a shared secret key and a counter. In the TOTP algorithm this counter is replaced by the current timestamp. Therefore it is important for the server and the client to have the same time. More about the timestamps later.
The TOTP algorithm was published as the RFC 6238 by the Internet Engineering Task Force (IETF).
Shared Secret
The TOTP and the HTOP algorithms use a shared secret that is created when the second factor method is set up. Often, this shared secret is embedded in a QR code for the ease of use. This QR code can then be scanned by a app such as Google Authenticator or Authy.
1. Calculate Timestamp
As mentioned above, the TOTP algorithm is a HOTP algorithm where the counter is replaced by the current time. For the default TOTP algorithm this is the UTC timestamp in number of seconds elapsed since the 1st of January 1970 not counting leap seconds. This time is also known as the Unix Epoch Time or just Unix Time. For example, if we would take the 20th of April 2021 00:00.00, we get a number of seconds equal to 1618869600. You may try it by yourself here.
As a token is valid for a certain period, we need to calculate the number of steps since 0. One step is usually 30 seconds. For example, if we currently have the Unix Time of 10 seconds, the time step would be a 0. If we pass the 30 second mark our timestep becomes a 1. After one minute we are at timestep 2 and so on. To calculate the timestep we can use the following formula:
\[N = floor({T_{unix} })\over ts\]N : The number of timesteps in the Unix Epoch Time.
Tunix : Number of Seconds elapsed in the Unix Epoch Time not counting leap seconds.
ts : Number of seconds for one timestep. By default this is 30.
floor : Function which rounds a number downwards to its nearest integer value.
The following graphic by mobilefish.com shows the correlation of timesteps to the actual Unix Time really well.
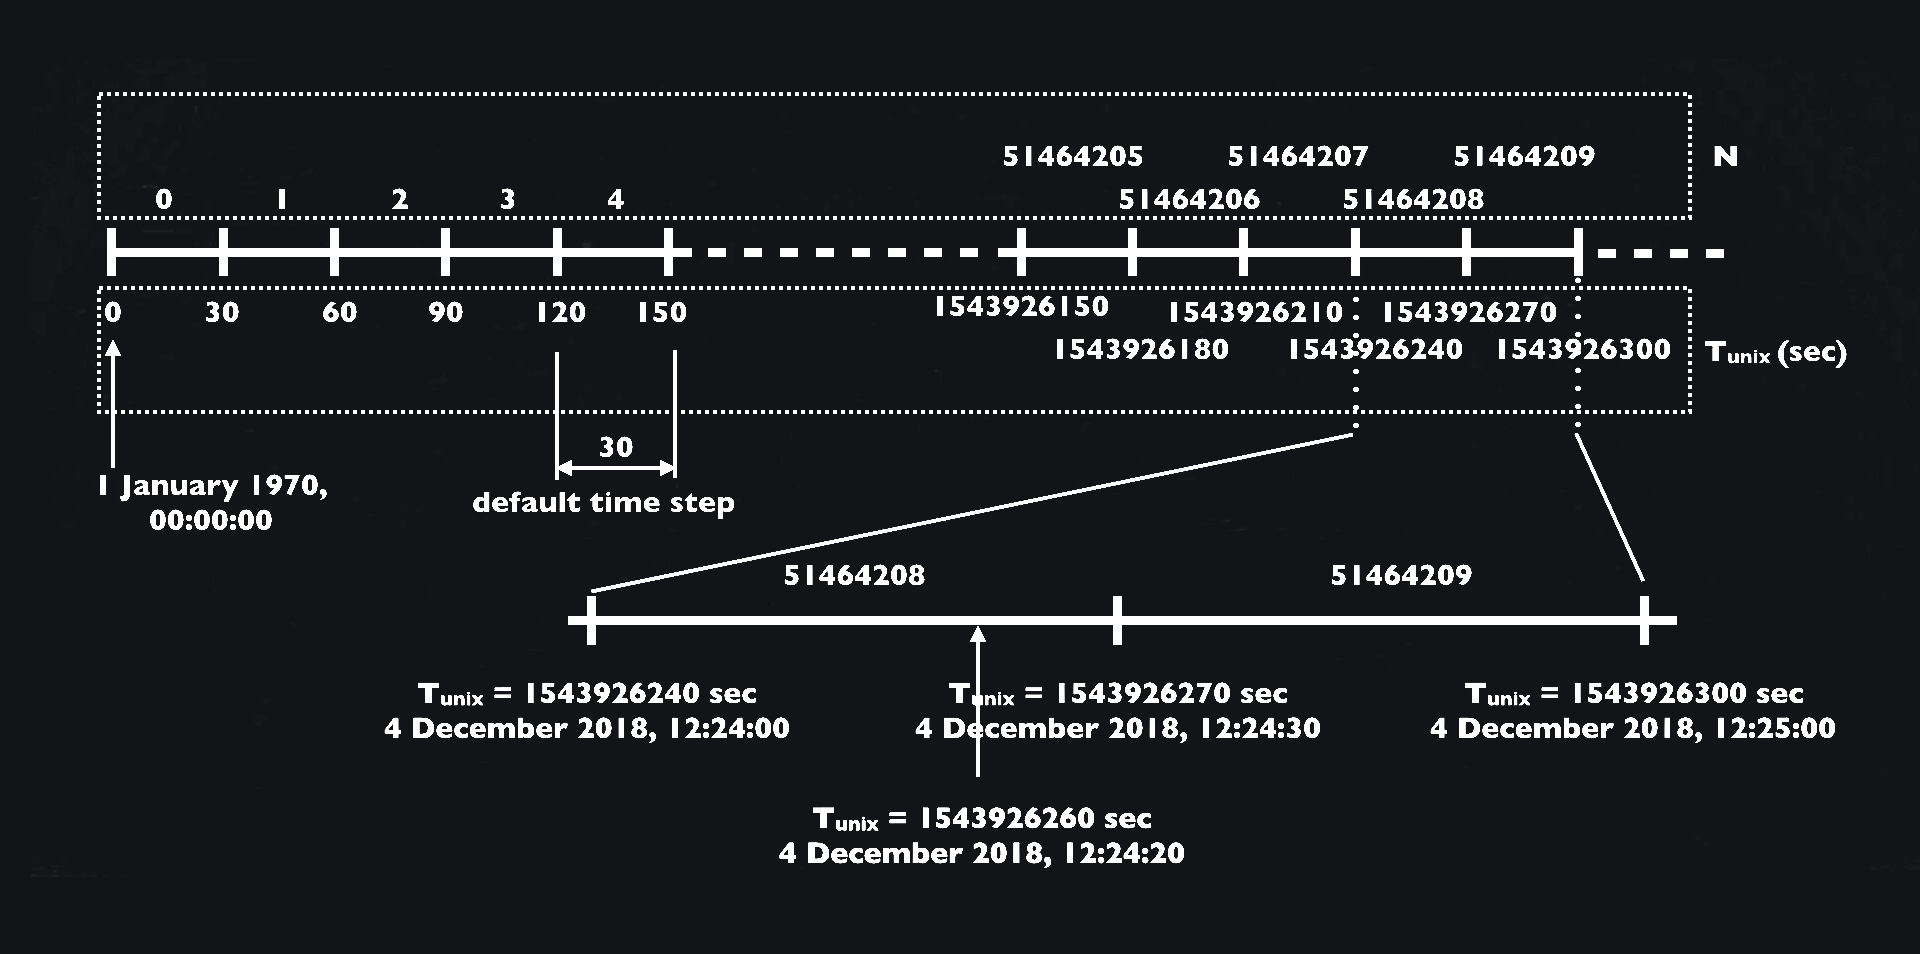
So we do now have the number of timesteps taken. This number now has to be converted to a hexadecimal value with 16 characters, which equals to 8 bytes. If the hexadecimal number is too short, prepend the number with zeros.
Example:
Let’s assume the current date and time is the 1st of January 2020 at 00:00 o’clock.
1577833200 / 30 = 5259444052594440 (Decimal) = 0x0000000003228708 (Hexadecimal)This hexadecimal value is now assigned to the variable message.
2. Generate Shared Secret Key
The shared secret key is a randomly generated 20 bytes number which is encoded by Base-32. This shared secret key is given to the user by the server and should, as the name implies, remain secret. If this key is displayed to the user, it shall only contain lowercase letters and shall be divided into four groups to increase the readability. The key shall only displayed once and shall not be viewed by the user after the setup is finished. This prevents an attacker stealing the shared secret key.
Example:
Let’s assume we generated a random shared secret key which looks like this in Base32 (spaces excluded):
61 65 62 61 67 62 61 66 61 79 64 71 71 63 69 6b 62 6d 67 61 75 64 71 70 63 65 6a 62 67 66 61 76Let’s save this to the variable key. This could also be written as characters for better readability, like so:
aeba gbaf aydq qcik bmga udqp cejb gfavThe string you see above can also be entered in the two-factor app manually.
3. Prepare the Hash
Now let’s generate the six-digit number which is often needed for two factor authentication.
First, we have to generate the HMAC-SHA 1 Hash of our two variables message and key we assigned earlier. This will output a 160 bit hash which equals to 20 bytes.
Now a few steps have to be done to get our six-digit number. First the last four bits of the generated hash are taken. These four bits are called the offset. In the case of the example (see below) this would be 0x9 which represents the number 9 in the decimal system.
Next, we take start at the index equal to the offset (counting each byte, starting from 0) and take the next four following bytes. Save these four bytes as we will continue to work on those.

We apply now for each of the four bytes a binary operation. On the first byte we use the AND-Operator with a value of 0x7F. Where on the remaining three bytes we do use also an AND-Operator, but this time with a value of 0xFF.
Now we convert the hexadecimal number to a decimal one and get to calculating the token already.
Example:
If we compute the HMAC-SHA1 hash of the secret key and the time stamp as our message we do get the following hexadecimal output (spaces excluded):
00 35 78 ad 97 61 31 1b 7a f7 6d e7 07 16 e8 d1 fb b5 1b 59We start at the
00 35 78 ad 97 61 31 1b 7a f7 6d e7 07 16 e8 d1 fb b5 1b 59 Apply the binary AND-Operation (with a value of 0x7F) to the first byte:
0x6D &0x7F=0x6D Apply the binary AND-Operation (with a value of 0xFF) to all remaining bytes:
0xE7 &0xFF=0xE7 0x07 &0xFF=0x07 0x16 &0xFF=0x10 4. Get the Token
From our decimal value we can now calculate the token by calculating our decimal number (integer) modulo ten to the power of the token length. The token length usually is six digits.
\[token = integer \%10 ^ {tokenlength}\]token: Token we want to get.
integer: Decimal number calculated in step 3.
tokenlength: Length of the token. Usually, 6.
If the token size is less than the expected token size, do append 0‘s until the length matches.
Example:
Using the formula above we calculate:
1843857168 % 10^6The result for our example would be in this case 857168.
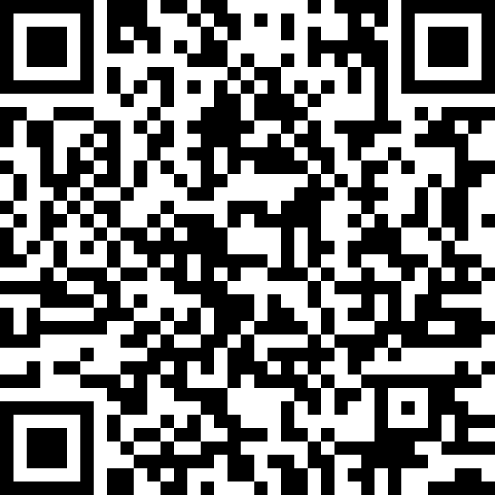
Generate the QR-Code
We have discussed how to generate the token from the shared secret key, but we do still need to get the users to calculate this token by themselves. Luckily this is usually done by an app on the mobile phone such as Google Authenticator or Authy. These apps offer to scan a shared secret key by using QR codes. So, let’s discuss how to generate the content for this QR code.
It’s quite simple really. The basic string looks like this:
otpauth://totp/Label?secret=SharedSecretKey&issuer=Issuer
The Label can be used to label the item in the app. This may be the username or some other information to tell the user to which account the key belongs. The SharedSecretKey is the shared secret key we generated earlier, and the Issuer is usually the company or website which issued the key to the user.
Example:
In the case for our example the string would look like this:
otpauth://totp/Test%20Account?secret=aebagbafaydqqcikbmgaudqpcejbgfav&issuer=Oberholzer.it
We can now put this into an QR code generator to get the following result which can be scanned by an authenticator app like Google Authenticator.
Conclusion
Multiple factor authentication matters a lot nowadays. Even if not really necessary it can prevent losing an account in the event of a successful attack. A lot more systems should provide the option to enable the login with two factors as they are quite easy to implement.